Showing posts with label diy. Show all posts

Monday, February 17, 2014

peanut butter banana cream pie


all i can say is... i love extra days off work.

honey-roasted peanut butter banana cream pie 
(and get this--no bake!)

ingredients
(for crust)
• 8 oz chocolate wafer cookies (i used teddy grahams!)
• 2 tablespoons brown sugar
• 5 tablespoons unsalted butter, melted

(for filling)
• 10 oz (2 cups) honey roasted peanuts
• 1 banana, peeled and cut into chunks
• 1 tablespoon honey
• 2 cups heavy cream
• ¼ cup granulated sugar
• 1 teaspoon vanilla extract 

directions
(for crust)
• crush cookies in a food processor until finely ground 
• transfer to a bowl and stir in brown sugar
• add butter and mix until evenly incorporated
• press into the bottom of a 9in spring form pan (or you can use a 9in pie pan)
• freeze crust until filling is ready

(for filling)
place peanuts in a blender (or food processor) and turn machine on lowest speed, gradually increase (you may have to stop the blender every now and then to scrap the sides). mix until the peanut butter begins to flow freely from the blades. transfer the peanut butter to a large bowl, scraping as much of the peanut bugger out as you can. 

don't worry about cleaning the blender at this point. add banana chunks and honey. turn to the lowest speed and then increase for about 1 minute or until the banana is liquefied. pour into bowl with peanut butter and stir to combine

wash and dry the blender to remove any residual peanut butter. you want to be sure it is very clean at this point so your cream will whip up properly.

add cream, sugar, and vanilla to blender. turn to the lowest speed, then increase for about 10 seconds. watch very carefully, the second the top of the cream stops moving, turn off the mixer immediately. over-mixing will result in butter rather than whipped cream.

stir the whipped cream in the blender to even out the consistency. remove about 1 cup of cream and set aside to use as a garnish later. add about half of the remaining whipped cream into peanut butter mixture; fold to incorporate and lighten the filling. fold in the remaining whipped cream until smooth.

pour filling into prepared crust, smoothing top with an offset spatula or butter knife. spoon or pipe remaining whipped cream in a decorative manner around the edges of the pie.  if using a springform pan, cover the entire thing with aluminum foil (without touching the cream). if using a pie pan, leave it uncovered. refrigerate or freeze for 1-2 hours or until set or frozen. (if frozen let it come to room temperature for 10-15mins before serving.


recipe adapted from love & olive oil


Tuesday, February 4, 2014

Barley, Cauliflower, and Herbs with Burrata


oh boy you guys don't even KNOW!
i'm feeling generous tonight and gifting you healthy, yummy goodness
something sooo good you'd probably pay top dollar at a fancy-shmancy restaurant.
so without further ado, i share with you a recipe that you must try...

barley, cauliflower, and herbs with burrata

ingredients:
1/2 cup pearl barley
1/4 cup fine breadcrumbs 
1 tbsp extra-virgin olive oil, plus more for drizzling
2 cups whole milk
1/2 cup finely chopped celery hearts
1/4 cup finely chopped celery leaves
1/4 cup finely chopped fresh flat-leaf parsley
1/4 cup finely chopped fresh flat-leaf parsley stems
1/2 tsp. finely grated lemon zest
2 tbsp champagne vinegar (or white vinegar)
8 oz burrata, torn
1 tbsp creme friache
coarsely ground black pepper

directions:
preheat oven to 350°. cook barley in a large pot of boiling salted water until tender (about 15-20 mins). drain and spread out on a rimmed baking sheet; let cool.

meanwhile, toss breadcrumbs with 1 tbsp olive oil on another rimmed baking sheet; season with salt. bake, tossing once, until golden brown (10-12 mins); let cool. (i used japanese panko breadcrumbs)

bring milk to a simmer in a medium saucepan over medium-high heat; season with salt. add cauliflower and cook until just softened (about 3 mins); drain well. discard milk.

toss cauliflower, barley, breadcrumbs, shallot, celery hearts, celery leaves, parsley, parsley stems, lemon zest, lemon juice, and vinegar in a bowl (i used orange champagne vinegar from trader joe's -- so good!). season salad with salt.

mix burrata and creme friache in a medium bowl; season with salt. divide burrata mixture among plates, drizzle with olive oil and top with barley salad; season with pepper


I ALWAYS recommend buying as much of your produce from a local farmers market. it tastes better, i swear!.. and you're supporting local famers and businesses :)


*adapted from bon appetit january magazine

Wednesday, December 14, 2011

DIY: friendship bracelet

i finally got to making the friendship bracelets i so badly wanted to make last summer
i found a diy on my one of my favorite blogs (honestlywtf) and followed each step

i, unfortunately, couldnt do this little diddy last summer due to a broken hand
but im back in action and can't wait to make more
 its tedious work and it took me a couple of tries to get it right
but im so in love with my new bracelet
i think i'll do another tonigh, maybe get a little more wild with the colors
(i bought some swarovski crystal chain, oOoOoo!)
all products can be found at ornamentea (my new favorite site - i must stop buying!)


Thursday, June 16, 2011

DIY: succulents in a mason jar

yesterday i was getting a little stir crazy alone at home with bad daytime t.v.
so i decided to take a little trip to the art store to see what crafty thing i could conjure up.

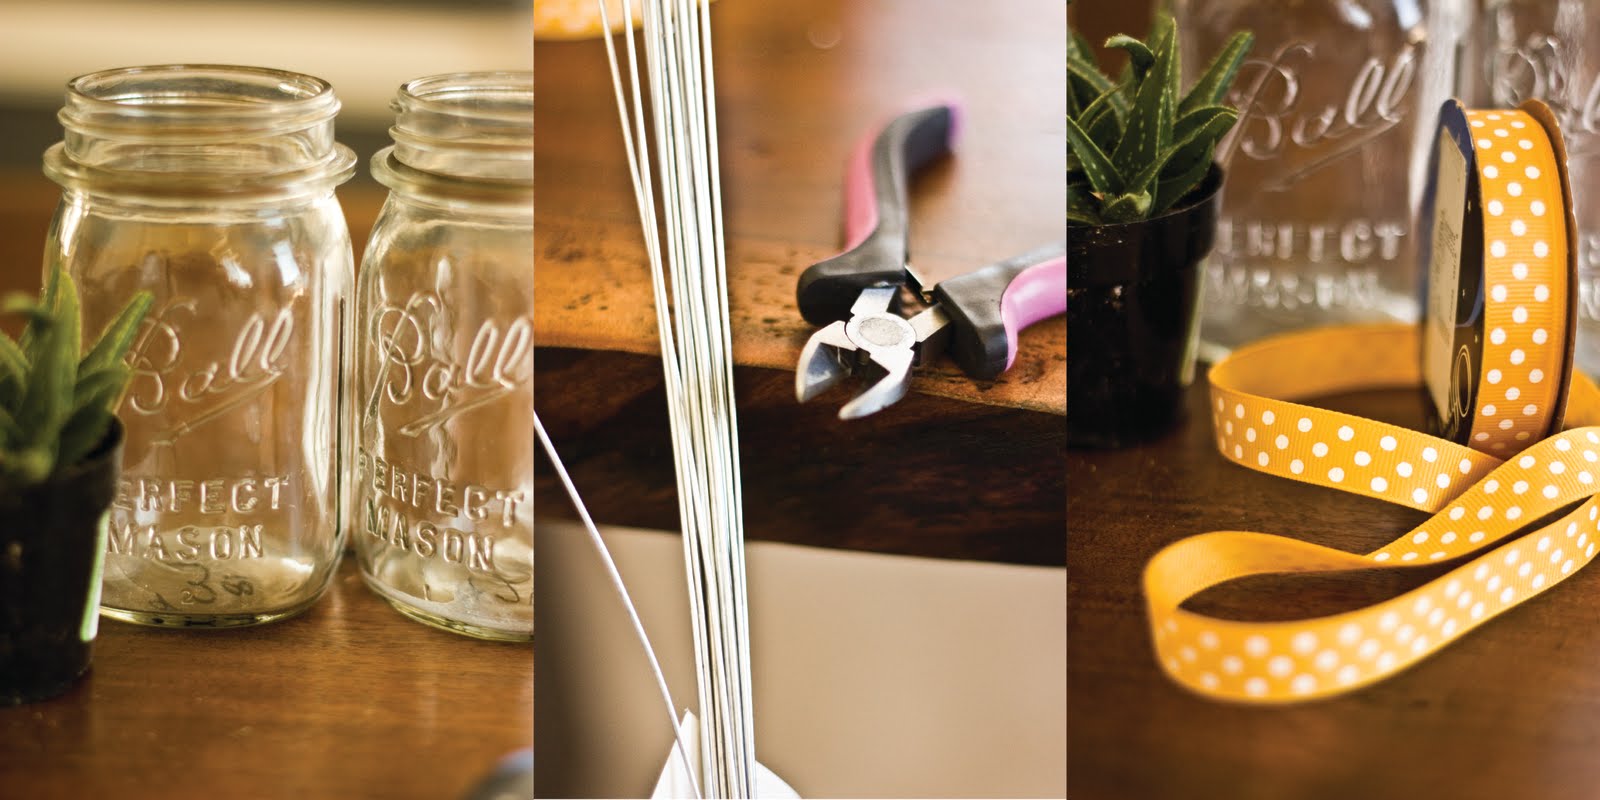
i had bought some mason jars at a local antique, furniture store and thought of making vases out of them. i chose succulent plants because they're low maintenance and only need water once a week.

i call these:
"a jar full of cacti" 

now let me just remind you that i am minus my dominant [right] hand, so if i can do this, i betchtya you can too!
what you will need:
mason jars
succulent plants (be sure the will be small enough/big enough to fit your jars)
cactus-friendly soil
ribbon
stem wire
 wire cutting and bending tools
scissors 
instructions:
1) depending on how deeply rooted your cactus plant is, fill the mason jar with about a handful of soil.
keep in mind that you don't want too much soil, as you don't want it to look like a jar of dirt.

2) gently place your plant in the jar and fill dirt around it so it is "planted" in the jar.

3) water the plant.
(fyi--succulents/cacti do not need very much h2o)
4) take your stem wire and wrap it around the bottom lip of the mason jar. with your wire tools, make a circle at one end of the wire and loop the other end through. it should look like the above photo.
(don't worry if its oddly shaped; you will be tying ribbon around it to hide the wire).
5) take another wire stem and hook the ends into the wire that is now around the jar. you may need to use your wire tools to make a loop.
6) cut your ribbon according to the size of your jar and cut the ends at a diagonal to make "v" shaped ends.

7) tie the ribbon around the jar and cover up the wire.
8) now, hang as you please!!

i think next time i may use leather straps to use as the "hanger" and i may also add some beads 

let me know how yours turn out. i want pictures please!

Wednesday, June 1, 2011

pinwheel party.

yesterday evening, my best friend, davana, came over with her boyfriend to make pinwheels with tay and i.

the night was full of hot glue guns and burnt fingers, stepping on head pins, drilling, snapping wooden dowels with inadequate scissors... and it was the most fun i've had on a tuesday night!

we drank wine, we ate, we laughed...
pinwheel instructions:

what you'll need:
several sheets of 12" x 12" double sided scrapbook or decorative paper
round-headed pins
12" wooden dowels
hot glue gun and glue sticks
a push pin
flower shaped craft punch
a pair of scissors
a ruler

pinwheel instructions:
1. begin by measuring and cutting 6" inch squares out of your paper

2. find the center of your one of he squares and mark it by poking a hole through it with your pushpin

3.lay your paper patter side down, and use your ruler to draw diagonal lines from each corner to make an "x".

4. cut along the diagonal lines from all four corners, stopping one inch before you meet the hole in the center of your paper. 

5. use your pushpin to make a hole in the right hand corner of each side of the square, just to the left of the line you just cut.


6. use your punch to cut out a paper flower. stick your round-headed pin through the center of the flower.


7. one by one, bring each of the for pin-holed corners to the center and stick the flower and pin through each of the four holes.


8. next, put the pin through the hole in the center of the square and set aside.


9. make a pilot hole, using your pushpin, 1/2 inch down from the end of the dowel.


10. put a drop of hot glue on the hole, and quickly insert the pin that runs through the pinwheel center into the glue and dowel. Be careful not to let the pinwheel paper touch the glue on the dowel while its drying. if it sticks, it can't spin!


it was fun to spend this pinwheel affair with such lovely people who i love dearly

happy wednesday my friends. we're half-way to the weekend!

*pinwheel instructions courtesy of:oncewed.com